Archive

Posts Tagged ‘C++’

You cannot call derived member function in the base destructor!

July 25th, 2020 Comments off

Consider the following code …

In the code you would be forgiven for thinking that the function “This()” would be called from the derived class, but in fact it is called from the base class

This is because the derived class has been deleted by the time we call the base destructor.

Moral of the story, clean up what you need to cleanup in your derived class, ’cause the base class is not going to do it for you!
Categories: development Tags: ,

C++ Equivalent of SpinWait.SpinUntil

November 30th, 2019 Comments off

I like to use threads in my code, but the problem with threads is that sometimes you need to wait for them to finish.

In c++ it is very easy to do.

All the code above does is, start a thread, call the function my_function and passes the argument 1.
The t.join(); tells the main thread to wait until the thread is finished.

Now the problem is that t.join() could hang forever … and I would never know about it.

What I needed was something like join_until( 1000) where we either wait for the thread to finish or wait for 1000ms. What I needed was something similar to c# SpinUntil

In very simple terms all SpinUntil does is check a condition, (very often), and if it is true then return (true), but if a timeout happens then we return (false).
So in my case I would wait for the thread to complete, (yes I know, I know, you can’t easily tell if a std::thread is complete or not.

Enter Wait.SpinUntil …

Basically we will

  1. Start a new thread
  2. Check if the given condition is true
    1. If the condition is true, return true
    2. If the condition is false … continue.
  3. Wait for a couple of nanoseconds for other threads to do their bit
  4. Look how long we have been spinning
    1. If less than milliseconds go back to number 2
    2. If more than milliseconds, return false.

The code

This is a very simplified version of the code, you can find a working solution on my github page

So now the code above will wait for a couple of ms while running in the background and if the given condition is true we will get out and return true, otherwise we will return false after a while.

Possible issues

  • For one thing, the condition() function could hang, it is up to the caller to make sure this never happens.
  • The condition() function could take a rather long time to execute … it is up to the caller to make sure this never happens

In other words, don’t stuff things up in your condition() function.

Categories: development Tags: , , ,

Add Google test directly to your Visual Studio project

November 9th, 2019 Comments off

Why?

While it is easy(ish) enough to add google test using various packages, you might want to add it directly to your project, (to debug your tests and so on).

I also found that packages are not always as often as you might want, so it might be because you need a new feature or something added to your test.

Before we start

– I am using Visual Studio 2019, but it should work fine with 2017 and even 2015
– I am using the latest Google Test (v1.10 at the time of writing this, but the principle is the same for almost all versions and should work fine for a few versions.

Getting started

  • Go to Google test on Github and get the latest release, make sure you get the ‘source code’
  • Don’t get it from anywhere else, you don’t know what has been changed and who changed it!
  • Remember that google test is written to a test application, not your main application!
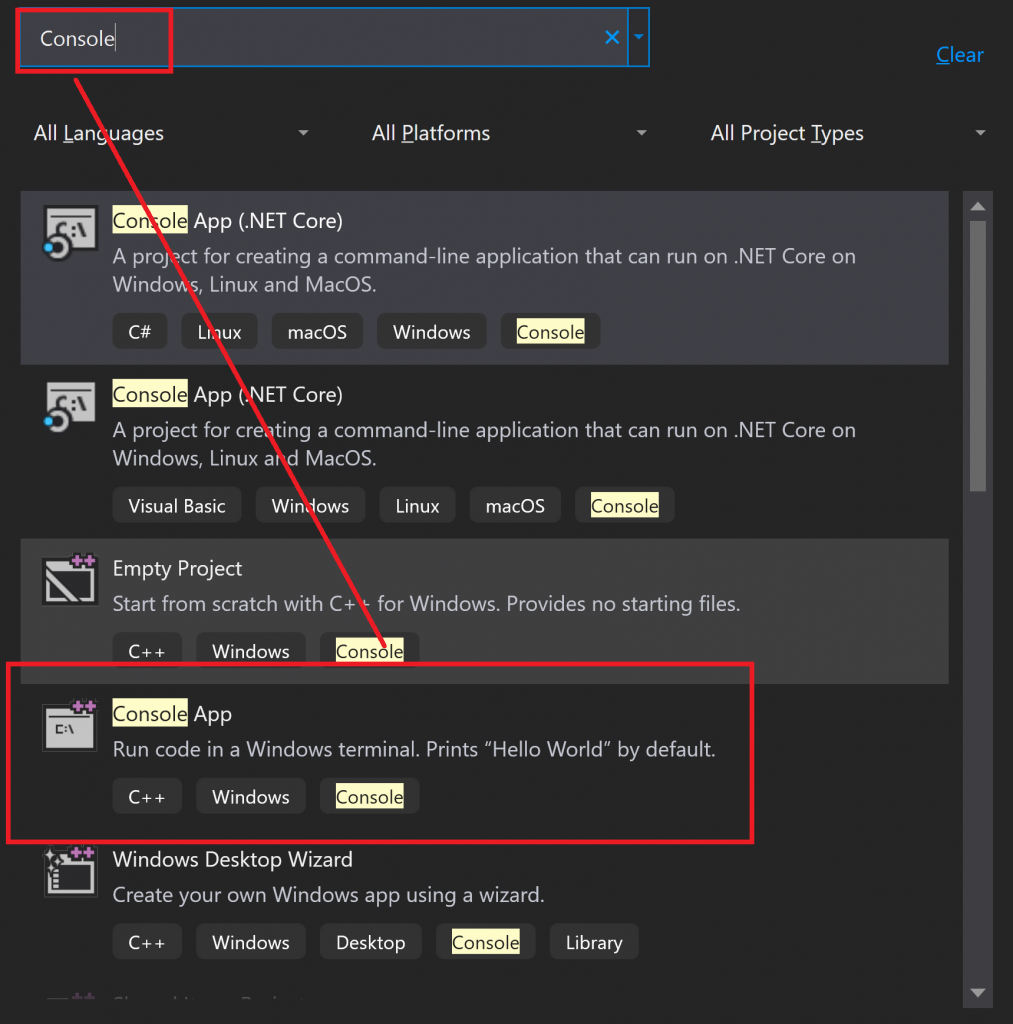
  • Create a new console application, (File > New > Project …) and select “Console App”

Now add Google Test

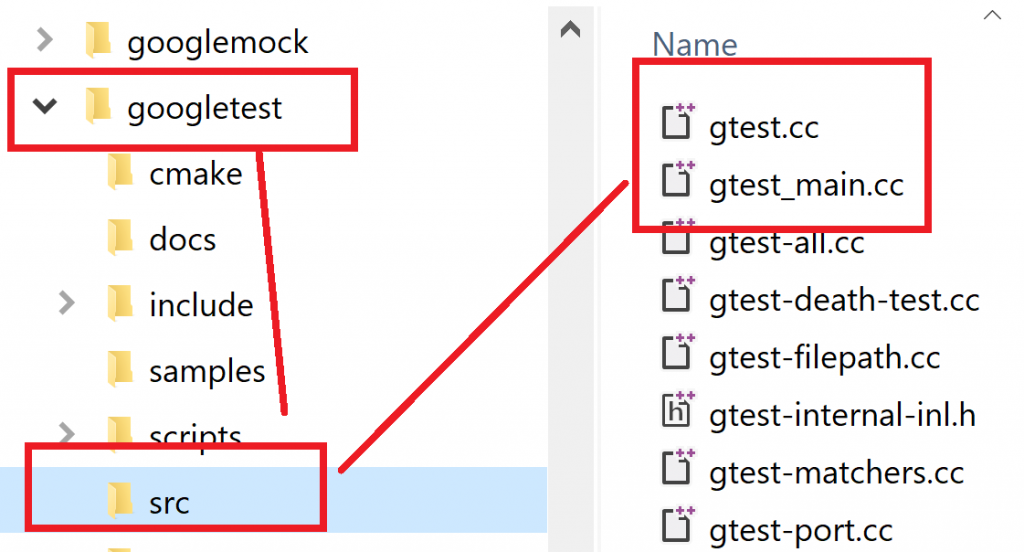
  • In your project, create a new ‘folder’, I normally prefer to have it mirror what it looks like in my actual windows source code directory, but you could call it whatever you want, (like I did below).
  • Right-click on the ‘src’ folder and select “Add > Existing Items…”
  • Navigate to the folder you extracted, and find the ‘googletest > src’ folder
  • And then select ‘gtest_main.cc’ and ‘gtest-all.cc’, nothing else.
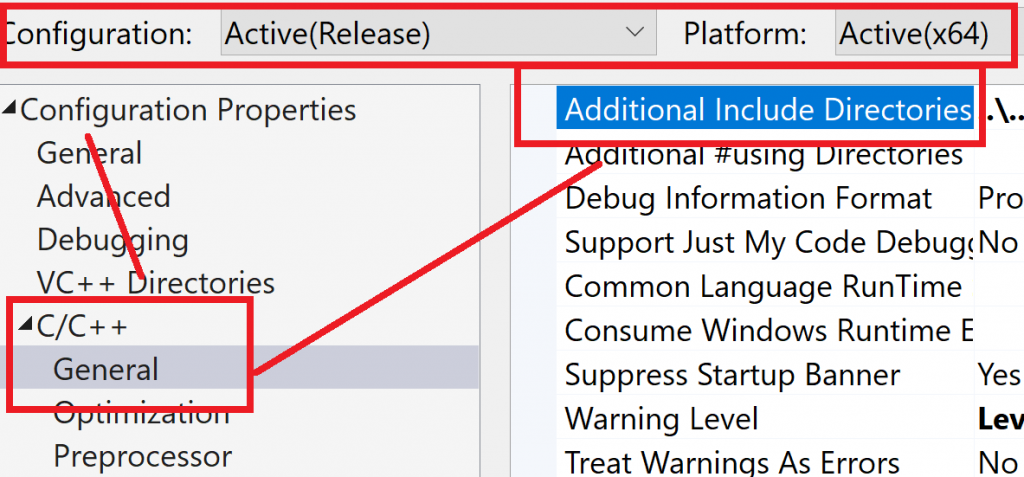
  • Finally, right-click your project and select “properties” and edit the “Additional Include Directories”
  • Add the directory relative to the location of your solution
    You could enter the full path if you want, (but that … blah), or you could use macros …
    Either way, make sure that the path is valid.
  • Make sure that the changes you make apply to all your build configuration.
    In the screenshot above I have x64 and Release but make sure that you choose all the configurations you will be using.
  • Compile your code … nothing funny should happen, (’cause you did nothing really).
    If you get an error, double check your paths and permissions.

Write and run a test

Last but not least, write a very simple test in your main and run a test

You do the rest

Now that a simple test is running, you can start creating tests for your own project.

Example?

Have a look at my directory watcher project and see my own tests.

As an aside, I am alway looking for comments, reviews and so on, please have a look at the project and comment!

Parallel.ForEach Async in C#

September 13th, 2019 Comments off

As mentioned in my previous post, to get a ‘proper’ parallel foreach that is async is a bit of a pain

So the solution is to write a true async function

And you can call it …

Of course, you can refine it by adding check for tokens that cannot be cancelled as well as empty sources

First prize you must make sure that the body of the ForEach takes in the token and cancels cleanly otherwise this will jump out with thread left up in the air… but at least it will get out.

Edit: As someone pointed out to me on StackOverflow there are a couple of subtle ways I can improve my implementation … so I added them here

Categories: development Tags: , , ,

What happens when you throw an exception in Parallel Loops

September 11th, 2019 Comments off

Bad things, bad things happen … explosions, tears … and maybe more

In the example above, the code will explode because of the exception.
So obviously we will add a try catch block…

And that will work, (of course)

But what if we want to run an async function in parallel … then what do we do?

In the case above you fire tasks, but don’t really wait for them to complete.
The async and await might give you the feeling that you are doing something truly in parallel … but you are not
Because Parallel.ForEach has no overload accepting a Func<Task>, it accepts only Action delegates.

The easy way out is to use Task as they were intended

Now obviously this is ugly code, but you get the idea … run all the tasks in parallel and wait for them all to finish.

Once they are all done, you can throw an aggregation of errors…. if there are any

Have a look at the code on my github page for more information/sample

What is the fastest lock in C#

August 26th, 2019 Comments off

I often wonder what the fastest lock is in C#.

If course they all have their own pros and cons, but when it comes to raw speed, what is the fastest lock.

We have a couple of options, but the common ones are

  • Lock object
  • Semaphore
  • Mutex
  • Read writer lock
    • Read
    • Write

The test was to add 10 million random numbers and test the various locks.

As this is not a multi threaded application, the waiting for the lock is imaterial here, we are only testing getting the lock.

In other words, this is an ideal scenario, you are not waiting for any lock, you are simply getting it.

Raw lock test

Obviously not getting any locks is faster, followed by both the ReaderWriterLockSlim, (read lock and write lock), then the SemaphoreSlim and the Mutex was, by far, the worse of them all.

  • The ReaderWriterLockSlim is slower because extra work is spent looking for re-entry as well as using a SpinLock
  • The SemaphoreSlim is even slower because we do a SpinWait and wait other threads to release the lock, (or locks as we could have more than one).
  • The mutex class is slower still because it puts the thread to sleep until it has access to the handle, and then wakes it up again.

You have a look at the code on my github page.

Categories: development Tags: ,

How to unit test a config file, (ConfigurationSection)

June 17th, 2018 Comments off

To unit test a ConfigurationSection in c# you need to do a couple of thing in your unit test
Of course, we do not want to change anything in the assembly being tested.

  • Create your own ConfigurationSection class
  • ‘Fake’ your own configuration file.
  • Test that you have the expected behaviour
    • For required values
    • Optional values

In your test application, create your own configuration loader class
It uses your configuration section as a template.

Of course we also need to clean up things a little.
The file we created needs to be removed, you could also have this in your test teardown.

Creating the fake test file.

Now testing the config is fairly straight forward, (using NUnit in this case)

(using the sample config content, my parser does not escape it properl)

<?xml version=""1.0"" encoding=""utf-8""?>
<configuration>
<configSections>
<section name=""blah"" type=""BlahConfiguration,MyApp.Blah"" />
</configSections>
<blah>
</blah>
</configuration>

So now you can create your tests and just pass the values you want to test, default values for example, that values are loaded properly and so on.

Powershell cheatsheet for C++/C#

June 22nd, 2016 Comments off

This is just a small post to help my ageing memory remember where things are located.

  • Powershell C#
    Locate the dll, System.Management.Automation.dll, and add it to your project, (or add it via Nuget).

    • See this blog for a good introduction on creating a project, (works for vs2015).
  • Check what version is installed
    • According to the official site you need to check the registry
      HKEY_LOCAL_MACHINE\SOFTWARE\Microsoft\PowerShell\1
      or
      HKEY_LOCAL_MACHINE\SOFTWARE\Microsoft\PowerShell\3
      And check that the value Install is set to ‘1’.
  • Debuging
    • The external program is C:\Windows\System32\WindowsPowerShell\v1.0\powershell.exe
    • But the actual location is:
      • Powershell 1: HKEY_LOCAL_MACHINE\SOFTWARE\Microsoft\PowerShell\1\PowerShellEngine\{ApplicationBase}
      • Powershell 3:HKEY_LOCAL_MACHINE\SOFTWARE\Microsoft\PowerShell\3\PowerShellEngine\{ApplicationBase}
    • Launching from debuger:
      • For a script:
        PowerShell -Command “& {.\myscript.ps1}” or
        PowerShell -File “.\myscript.ps1”
      • For a CmdLet/Module:
        -noexit -command “&{ import-module .\AMPowerShellCmdLets.dll -Verbose}”
  • Some links
Categories: development Tags: , ,

What I had forgotten about WM_CLOSE

March 28th, 2016 Comments off

When I was working on the next version of Piger I would sometime get an issue when using the this.bye command, (to close Piger).

What happens in the background is I call WM_CLOSE to close the active window, this message is sent to all the windows.

When it is processed by the message pump no other messages are been processed, this is a problem in case some windows are still dishing out messages, (like a fading dialog box in our example).

So remember, once you call WM_CLOSE, all bets are off and your message pump is as good as dead.

Best to have your own ‘Close()’ that does all the housekeeping in the background before you actually post WM_CLOSE to the main thread…

Otherwise your app my appear to hang.

Embed Python in your C++ application without Python installed on guest machine

February 27th, 2016 Comments off

For my Piger application, I wanted my C++ app to parse Python scripts but I quickly became aware of the fact that the user must have Python installed on their machine, not only that they needed the same version as mine, (version 3.5).

The normal call would be something like…

But that throws an error when the user does not have Python installed.
And if they have an older version installed, it _might_ work, but the scripts might not work as expected.

The solution is to embed the Python you want to run in your app.

  1. Go to the Python website and download the Embeddable zip file for your app, (x64 or x86)
  2. Extract the python35.zip located inside that zip file
  3. Copy it somewhere where it can be referenced.
  4. Add the code below.

Now your app will work using version Python 3.5.1