Archive

Archive for the ‘Cheat-sheet’ Category

How to add command line arguments to your piger commands

April 1st, 2020 Comments off

First the basics

The first argument is the command we wish to execute, the second one is the command line argument and the last one is if we wish to run as administrator or not, (with privileged access).

How to get the arguments?

You have various commands to get the arguments entered.

You can get the ones typed by the user

Or you can also get the selected folder if there is one

Remember that we could have selected more than one folder

Putting it all together

If you have an app like cmder or even the default command line app you can put it all together

And save the file and call it “cmder.lua” and save it in your root command folder, (or subdirectory).

Then if the user types

  • cmder home – they will go to their home directory
  • cmder – they will go to their system drive
  • cmder (with the cursor over a folder name) – they will go to that folder.

More?

You can get more information on the piger github page
Categories: Cheat-sheet, Myoddweb Piger Tags: ,

Design principles – SOLID

February 29th, 2020 Comments off

We often ask people in interview to explain the solid principles and what they mean.

The other day I found a series that goes into details about the SOLID principles

Those are rather long videos, but they go into great details explaining the SOLID principle.

Add Google test directly to your Visual Studio project

November 9th, 2019 Comments off

Why?

While it is easy(ish) enough to add google test using various packages, you might want to add it directly to your project, (to debug your tests and so on).

I also found that packages are not always as often as you might want, so it might be because you need a new feature or something added to your test.

Before we start

– I am using Visual Studio 2019, but it should work fine with 2017 and even 2015
– I am using the latest Google Test (v1.10 at the time of writing this, but the principle is the same for almost all versions and should work fine for a few versions.

Getting started

  • Go to Google test on Github and get the latest release, make sure you get the ‘source code’
  • Don’t get it from anywhere else, you don’t know what has been changed and who changed it!
  • Remember that google test is written to a test application, not your main application!
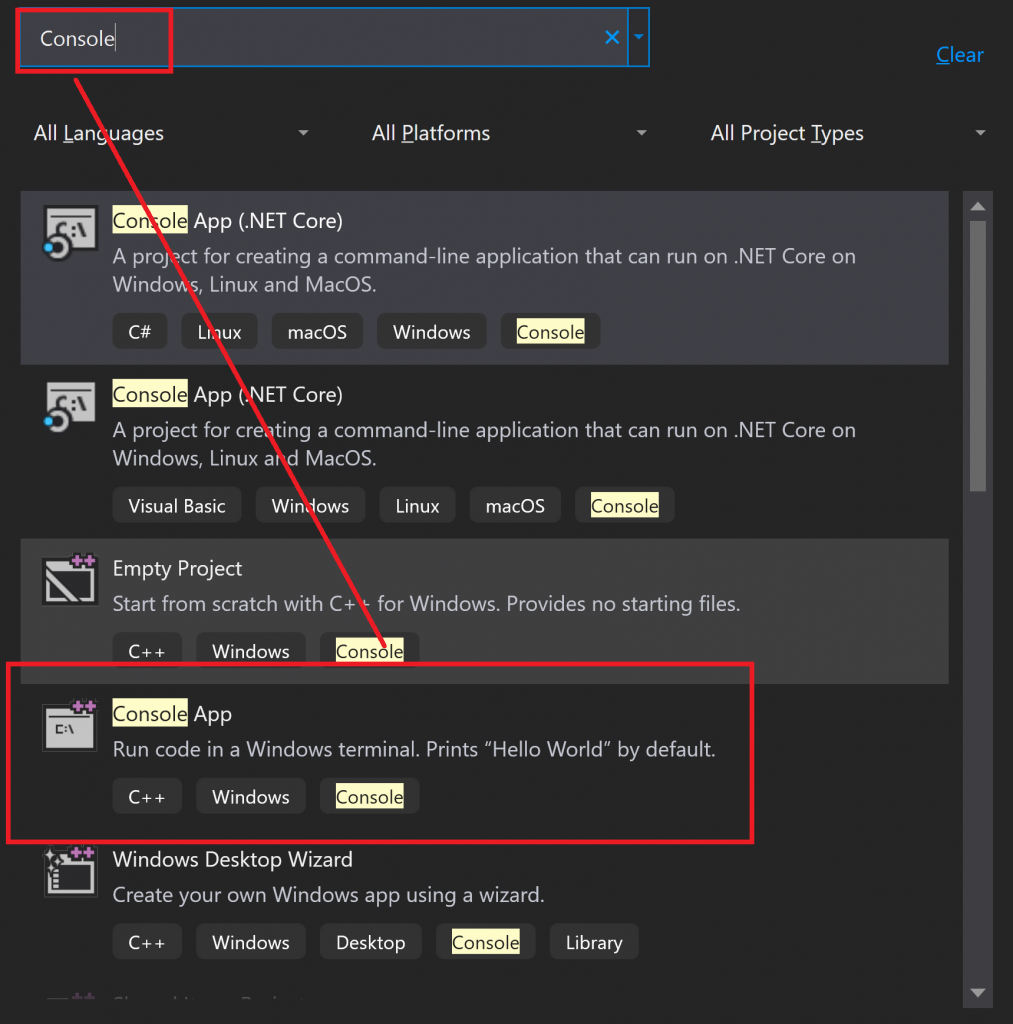
  • Create a new console application, (File > New > Project …) and select “Console App”

Now add Google Test

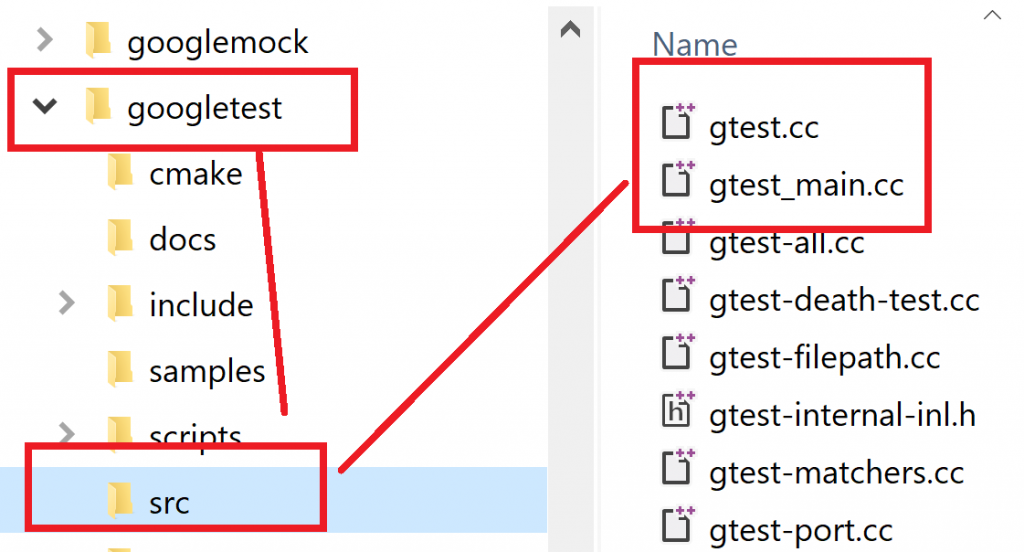
  • In your project, create a new ‘folder’, I normally prefer to have it mirror what it looks like in my actual windows source code directory, but you could call it whatever you want, (like I did below).
  • Right-click on the ‘src’ folder and select “Add > Existing Items…”
  • Navigate to the folder you extracted, and find the ‘googletest > src’ folder
  • And then select ‘gtest_main.cc’ and ‘gtest-all.cc’, nothing else.
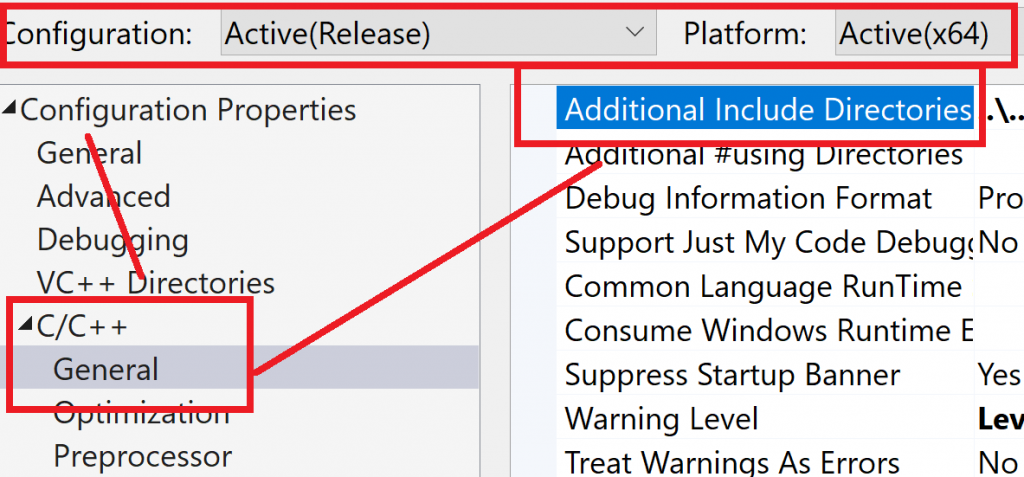
  • Finally, right-click your project and select “properties” and edit the “Additional Include Directories”
  • Add the directory relative to the location of your solution
    You could enter the full path if you want, (but that … blah), or you could use macros …
    Either way, make sure that the path is valid.
  • Make sure that the changes you make apply to all your build configuration.
    In the screenshot above I have x64 and Release but make sure that you choose all the configurations you will be using.
  • Compile your code … nothing funny should happen, (’cause you did nothing really).
    If you get an error, double check your paths and permissions.

Write and run a test

Last but not least, write a very simple test in your main and run a test

You do the rest

Now that a simple test is running, you can start creating tests for your own project.

Example?

Have a look at my directory watcher project and see my own tests.

As an aside, I am alway looking for comments, reviews and so on, please have a look at the project and comment!

Delete a git branch local and remote

November 10th, 2018 Comments off

This is a continuation of my earlier post about pruning deleted branches

To delete a local branch 

or you can ‘force’ a delete if you have uncommitted changes
The -D is the same as --delete --force

To delete the branch remotely, simply do …

You can also do it like that if you prefer.

Again, you can use -d.

If you want to delete a remote and local branch, it is easier to first delete the remote branch and then the local branch.

You can then go ahead and prune all the branches.

Categories: Cheat-sheet, development Tags: , , ,

How to delete/prune old local git branches

October 27th, 2018 Comments off

When you delete a branch with git, and push those changes, you might see that your local repo still has that branch in the list

What this basically does is fetch all the branches and all the ones with a ‘gone’ attribute, (meaning deleted remotely), then we will remove them.

You can view the branches and what their attribute is yourself by typing

Of course, you need to prune the branches on the remote git server

To make sure all is good, just re-list your branches, (local and remote)

Categories: Cheat-sheet, development Tags: ,

Migrating from MSTest to NUnit

March 28th, 2018 Comments off

I am using VS2015 and VS2017 and I needed to migrate from Microsoft Unit tests to NUnit.

Those are the steps are followed.

  • In VS2015/2017 Select the “Package manager console” tab
    Select the correct project, (drop down combo), and type

  • Or using Nuget manager
    • Select the correct project.
    • Select NUnit, (just the plain ‘NUnit’ for now).
  • In your test project, look for “using Microsoft.VisualStudio.TestTools.UnitTesting;
    Replace with “using NUnit.Framework;“, (of course you will now have a whole bunch of errors.)
  • Look and replace
    • [TestClass] replace with [TestFixture]
    • [TestMethod] replace with [Test]
    • Remove code that looks like “[ExpectedException(typeof(xyz), “some text”)]” and surround the actual code that is expected to throw

NB: Note you might need to change a couple of other values

  • [TestInitialize] to [SetUp]
  • [TestCleanup] to [TearDown]
  • [TestClassInitialize] to [TestFixtureSetUp]
  • [TestClassCleanup] to [TestFixtureTearDown]

And a few other functions will need to change as well but for the most part they start with Assert.... and are fairly close(tm) to the Microsoft counterparts.


Deleting folders that refuse to be deleted…

September 13th, 2017 Comments off

Sometimes when you want to delete a folder in windows you get a very useful message “Could not find this item… this is no longer located in …”, (yes, the very item you just tried to delete).

So after a bit of cursing, making sure that you are indeed the admin of this box, praying to the windows gods you realise that maybe Windows Explorer is at fault.

Not to worry you think, you open up a cmd line console and navigate to the parent of the offending folder.

And like a true hacker you type

“rd c:\my\bad\folder”

only to be told once again, “The system cannot find the file specified.”

At this point your realise that the folder has spaces… so you think “no problem, I will quote the folder” and you now type

‘rd “c:\my\bad\folder “‘

with the correct number of spaces in the folder name.

Long story short… you cannot do that.

You cannot rename the folder, (I know you will try anyway, but you can’t)

So you Googled for a solution and here you are…

what you need to do is tell the command line to not trim the folder name and to do that, you have to add “\?\” in front, so now you type

‘rd /s /q “\\?\c:\my\bad\folder “‘

Complete with the extra spaces and so on… (I added the /s and /q flags because you forgot that the directory is not empty)

vs2015/2013 – Cannot see unit tests in Test Explorer window

November 29th, 2016 Comments off

If have some unitests in Visual Studio 2015 or 2013 but you cannot see them in your “Test Explorer window”

If you look in your output window, (under “Show output from:” > “test)

An exception was thrown while initializing part “Microsoft.VisualStudio.TestWindow.UI.TestWindowToolWindowControl”.

The solution is just to delete the VS2013/VS2015 cache folder, located either in

%LOCALAPPDATA%\Microsoft\VisualStudio\12.0\ComponentModelCache

For VS2013, or

%LOCALAPPDATA%\Microsoft\VisualStudio\14.0\ComponentModelCache

For VS2015

Git and submodule

September 7th, 2016 Comments off

Sometimes things get a little out of sync in your submodule folder, your ‘root’ project sometimes report something like

\ In the git branch
[branch = +0 ~1 -0 !]>

Or even  something along the lines of

\ In the submodule folder
[(7cd98ce...)]>

Showing that you are no longer on the correct branch, (for the submodule).

One one way to clean it all up is to do.

\ In the submodule folder
git checkout master
git pull
git push origin HEAD:master
git checkout master

Assuming that you have no other changes to commit

\ In the root folder
git clean -fd
git pull
git submodule update --init --recursive
git submodule update

And that should clear everything

Categories: Cheat-sheet, development Tags:

Using Github from command line

June 11th, 2016 Comments off

This assumes that you have all the permissions needed to access your repo, (passwords and so on).

Start Git Shell and navigate to your local repo.

Create a branch

git checkout -b <branch-name>
git push <remote-name> <branch-name>

In the case of github the remote name is ‘origin’

Source

Add your changes to the branch

git add .

The ‘.’ means ‘everything’ that was changed.

You can use ‘status’ to check what needs to be staged, (or what has been staged).

git status

Commit branch

git commit -m "You message here"

Push branch
The first time you need to tell where you are pushing this to.

git push --set-upstream <remote-name> <branch-name>

The afterwards you just need to do…

git push

Delete your branch

To remotely delete it

git push <remote-name> --delete <branch-name>

To locally delete it


git branch --delete <branch-name>

Source

Categories: Cheat-sheet, development Tags: ,