How to logout of GitHub Copilot in VS2022

January 13th, 2024 1 comment

If, like me, you have more than one Github account, (one for work and one private), then you might want to switch accounts when using Visual Studio

My private account does not have CoPilot, so it has a little fit when I try and open visual studio.

Now if you click on the link … it takes me to Github and, it doesn’t matter what I do, my credentials are not changed from my private account to my work account.

The solution is simply to force Github to forget about you

  • Close Visual Studio
  • Probably Close VS Code as well … not sure
  • Go to %localappdata%\github-copilot, (your local app data folder, something like C:\Users\%USERNAME%\AppData\Local\github-copilot)
  • Delete the files hosts.json and versions.json
  • Make sure you are logged in the correct Github account, (with Edge or Chrome or whatever).
  • Restart Visual Studio, you should get logged in auto-magically into your ‘correct’ github account, otherwise you can just login when prompted.

And that’s all, if you are not sure about deleting files you can just rename the folder “github-copilot” to something else, and if things go wrong just rename it back.

If you are not sure or comfortable with deleting, renaming and so on … don’t do it. … you probably should not be developing either in that case, but that’s another problem I guess.

Updating from Ubuntu 22.04 to Ubuntu 23.04

April 21st, 2023 Comments off

Now that Ubuntu 23.04 has been released this is the steps to update from 22.04

Of course, this assumes that you are on 22.04.
This guide is very “brief”, if you are not sure what a command does, please look it up first and make sure you know what you are doing.

If you brick your release, don’t blame me, do your homework first 🙂

Update everything

Update everything and install the update managed, (you probably have it already)

sudo apt update && sudo apt upgrade -y && sudo apt install update-manager-core -y

You might be asked a couple of questions, just say yes

When this is done you need to update the manager to tell it that you can update to the next release version

Open the editor and change the upgrade policy

sudo nano /etc/update-manager/release-upgrades

Change the “prompt” to “normal”, (press Ctrl-0 to save and Ctrl-X to exit)

Change the source list to now look at the “lunar” instance instead of “jammy”

sudo sed -i ‘s/jammy/lunar/g’ /etc/apt/sources.list

Update everything … again

sudo apt update && sudo apt upgrade -y

Do the actual update

sudo apt dist-upgrade -y

You will be asked a few questions, it really depends on your environment and setup.

Most questions are fairly straight forward, so say yes to everything.

You will also be asked to remove/replace certain things.
Just read the messages carefully, most of them are fairly simple to understand.

Done

You are now done, so just reboot, (takes a bit longer).

sudo reboot

Once the reboot is done, you can check the version number.

Categories: Ubuntu, Uncategorized Tags:

You cannot call derived member function in the base destructor!

July 25th, 2020 Comments off

Consider the following code …

In the code you would be forgiven for thinking that the function “This()” would be called from the derived class, but in fact it is called from the base class

This is because the derived class has been deleted by the time we call the base destructor.

Moral of the story, clean up what you need to cleanup in your derived class, ’cause the base class is not going to do it for you!

Categories: development Tags: ,

Strong Name Signing Your Assemblies

June 21st, 2020 Comments off

What is it for?

Strong naming basically helps to make sure that other assemblies can be 100% sure that they are using the correct assembly and they there has been no messing around

In reality, this not a 100% secure process, but it does help in most cases to add a certain amount of safeguard.

And in any case, a lot of applications require it, and if your app is not strong named, then they will not be able to use it.

How to add strong name to my assemblies

The process is fairly straight forward, (surprisingly so), and you don’t need to worry about Visual Studio until the end.

  • On your system locate the file called sn.exe, (in my case, I had a few of them, the actual version does not matter, but I chose the latest one I have).
  • Open a command line with Administrator privilege, (might not be required, but I don’t know how secure your system is).
  • Navigate to the folder where that exe is located.
What my command line looks like …
  • Create a key … any key, just make sure you give it a name that matters to your application
An example of what it might look like … but really you should use a better name
  • Now get the public key for your application
    sn -p "myassembly.snk" "pmyassembly.snk"
    I added the letter “P” in front of my strong name key … so I know it is the public key … but really, you can call it whatever you want.
Again … use a better name!
  • You might also want your public key as a string value
    sn -tp "pmyassembly.snk"
  • Or you can be one of the cool kids and output to your clipboard
    sn -tp "pmyassembly.snk" |clip
    And then you can paste it where ever
  • I really suggest that you move the file, (with a better name), to your directory
  • Then fire up your visual studio project
    • Look for the properties
    • Select the signing tool
    • And check “sign the Assembly”
The properties if your assemblies
  • Annoyingly enough, Visual Studio will move the file where it feels it should be, (next to the *.csproj), if you really want it somewhere else, just edit the *.csproj file and change the location yourself. Or don’t, whatever.
  • Build it
  • Ship it

What about my Unit tests?

If you have unit tests running and you are testing internal classes … then you will need to add the public key, (see above), to your InternalsVisibleTo( … )

At the end of the day, this is pretty much what consumers of your assembly will do.

What info must I share?

  • Your *.snk file
  • Your public key text value

Remember, this is just to verify the identity of your file, not to do some NSA proof securing of some sort.
You want to share the information so others can use it in their own projects.

More

Categories: development Tags: , ,

How to add command line arguments to your piger commands

April 1st, 2020 Comments off

First the basics

The first argument is the command we wish to execute, the second one is the command line argument and the last one is if we wish to run as administrator or not, (with privileged access).

How to get the arguments?

You have various commands to get the arguments entered.

You can get the ones typed by the user

Or you can also get the selected folder if there is one

Remember that we could have selected more than one folder

Putting it all together

If you have an app like cmder or even the default command line app you can put it all together

And save the file and call it “cmder.lua” and save it in your root command folder, (or subdirectory).

Then if the user types

  • cmder home – they will go to their home directory
  • cmder – they will go to their system drive
  • cmder (with the cursor over a folder name) – they will go to that folder.

More?

You can get more information on the piger github page

Categories: Cheat-sheet, Myoddweb Piger Tags: ,

Design principles – SOLID

February 29th, 2020 Comments off

We often ask people in interview to explain the solid principles and what they mean.

The other day I found a series that goes into details about the SOLID principles

Those are rather long videos, but they go into great details explaining the SOLID principle.

C++ Equivalent of SpinWait.SpinUntil

November 30th, 2019 Comments off

I like to use threads in my code, but the problem with threads is that sometimes you need to wait for them to finish.

In c++ it is very easy to do.

All the code above does is, start a thread, call the function my_function and passes the argument 1.
The t.join(); tells the main thread to wait until the thread is finished.

Now the problem is that t.join() could hang forever … and I would never know about it.

What I needed was something like join_until( 1000) where we either wait for the thread to finish or wait for 1000ms. What I needed was something similar to c# SpinUntil

In very simple terms all SpinUntil does is check a condition, (very often), and if it is true then return (true), but if a timeout happens then we return (false).
So in my case I would wait for the thread to complete, (yes I know, I know, you can’t easily tell if a std::thread is complete or not.

Enter Wait.SpinUntil …

Basically we will

  1. Start a new thread
  2. Check if the given condition is true
    1. If the condition is true, return true
    2. If the condition is false … continue.
  3. Wait for a couple of nanoseconds for other threads to do their bit
  4. Look how long we have been spinning
    1. If less than milliseconds go back to number 2
    2. If more than milliseconds, return false.

The code

This is a very simplified version of the code, you can find a working solution on my github page

So now the code above will wait for a couple of ms while running in the background and if the given condition is true we will get out and return true, otherwise we will return false after a while.

Possible issues

  • For one thing, the condition() function could hang, it is up to the caller to make sure this never happens.
  • The condition() function could take a rather long time to execute … it is up to the caller to make sure this never happens

In other words, don’t stuff things up in your condition() function.

Categories: development Tags: , , ,

Add Google test directly to your Visual Studio project

November 9th, 2019 Comments off

Why?

While it is easy(ish) enough to add google test using various packages, you might want to add it directly to your project, (to debug your tests and so on).

I also found that packages are not always as often as you might want, so it might be because you need a new feature or something added to your test.

Before we start

– I am using Visual Studio 2019, but it should work fine with 2017 and even 2015
– I am using the latest Google Test (v1.10 at the time of writing this, but the principle is the same for almost all versions and should work fine for a few versions.

Getting started

  • Go to Google test on Github and get the latest release, make sure you get the ‘source code’
  • Don’t get it from anywhere else, you don’t know what has been changed and who changed it!
  • Remember that google test is written to a test application, not your main application!
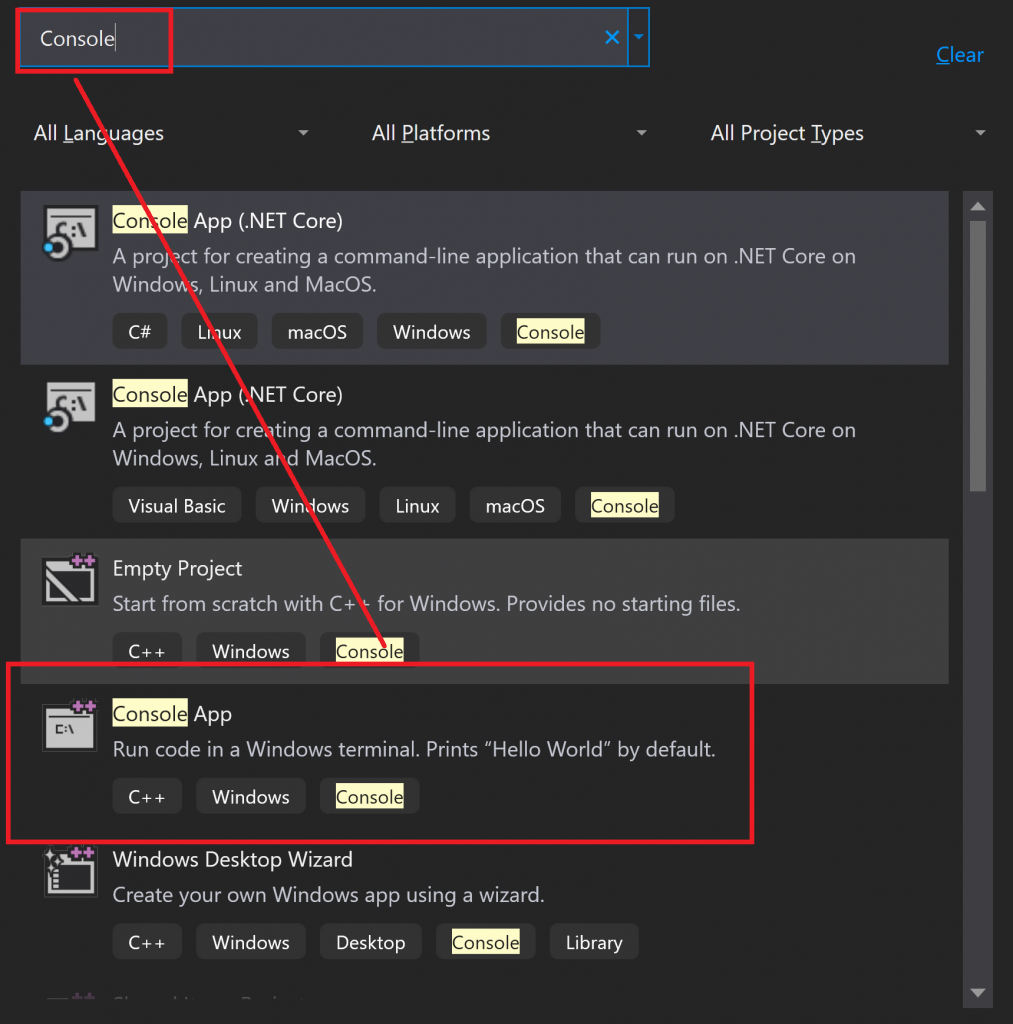
  • Create a new console application, (File > New > Project …) and select “Console App”

Now add Google Test

  • In your project, create a new ‘folder’, I normally prefer to have it mirror what it looks like in my actual windows source code directory, but you could call it whatever you want, (like I did below).
  • Right-click on the ‘src’ folder and select “Add > Existing Items…”
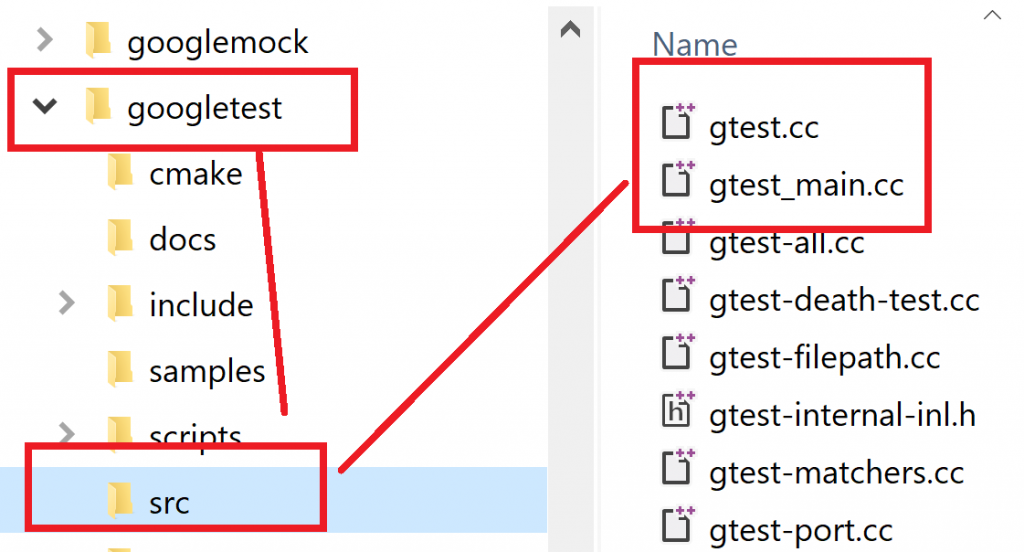
  • Navigate to the folder you extracted, and find the ‘googletest > src’ folder
  • And then select ‘gtest_main.cc’ and ‘gtest-all.cc’, nothing else.
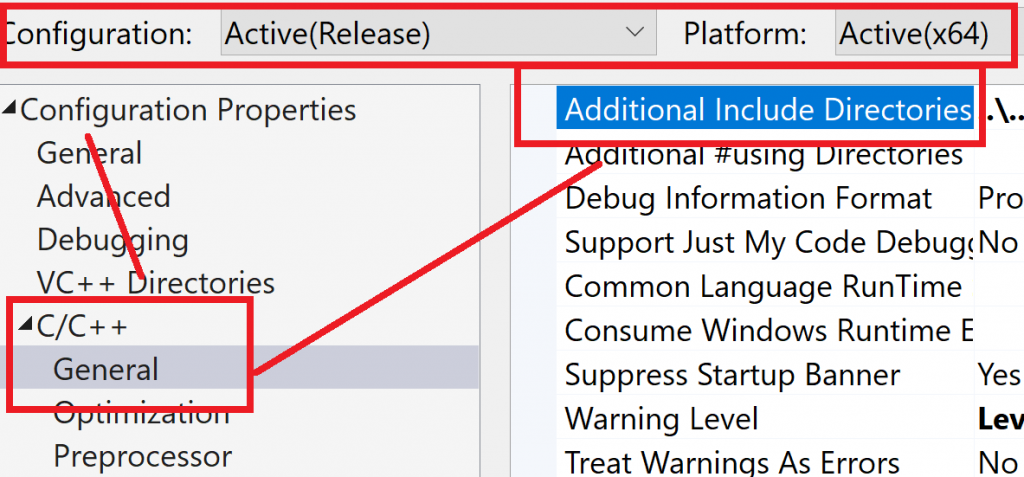
  • Finally, right-click your project and select “properties” and edit the “Additional Include Directories”
  • Add the directory relative to the location of your solution
    You could enter the full path if you want, (but that … blah), or you could use macros …
    Either way, make sure that the path is valid.
  • Make sure that the changes you make apply to all your build configuration.
    In the screenshot above I have x64 and Release but make sure that you choose all the configurations you will be using.
  • Compile your code … nothing funny should happen, (’cause you did nothing really).
    If you get an error, double check your paths and permissions.

Write and run a test

Last but not least, write a very simple test in your main and run a test

You do the rest

Now that a simple test is running, you can start creating tests for your own project.

Example?

Have a look at my directory watcher project and see my own tests.

As an aside, I am alway looking for comments, reviews and so on, please have a look at the project and comment!

Parallel.ForEach Async in C#

September 13th, 2019 Comments off

As mentioned in my previous post, to get a ‘proper’ parallel foreach that is async is a bit of a pain

So the solution is to write a true async function

And you can call it …

Of course, you can refine it by adding check for tokens that cannot be cancelled as well as empty sources

First prize you must make sure that the body of the ForEach takes in the token and cancels cleanly otherwise this will jump out with thread left up in the air… but at least it will get out.

Edit: As someone pointed out to me on StackOverflow there are a couple of subtle ways I can improve my implementation … so I added them here

Categories: development Tags: , , ,

What happens when you throw an exception in Parallel Loops

September 11th, 2019 Comments off

Bad things, bad things happen … explosions, tears … and maybe more

In the example above, the code will explode because of the exception.
So obviously we will add a try catch block…

And that will work, (of course)

But what if we want to run an async function in parallel … then what do we do?

In the case above you fire tasks, but don’t really wait for them to complete.
The async and await might give you the feeling that you are doing something truly in parallel … but you are not
Because Parallel.ForEach has no overload accepting a Func<Task>, it accepts only Action delegates.

The easy way out is to use Task as they were intended

Now obviously this is ugly code, but you get the idea … run all the tasks in parallel and wait for them all to finish.

Once they are all done, you can throw an aggregation of errors…. if there are any

Have a look at the code on my github page for more information/sample